

How To Add A Picture As A Background On A Google Drawing
If you're wondering how to put pictures in a Google Slides presentation, you're in luck. Working with images in Google Bulldoze Slides is not difficult once you know what to exercise.
Photos and graphics are an important office of any presentation. Images break upwards the text and add viewer interest. Information technology may be a platitude, but the old saying "a movie is worth a k words" is often true. A skilful picture can exist more effective than words.
In this tutorial, you'll larn what types of images y'all can use with Google Drive Slides. You lot'll also learn how to add a picture to Google Slides including how to use a motion picture every bit a groundwork for Google Slides. You'll besides acquire some techniques to make your images stand out in your Google Slides presentation.
Before yous jump into this tutorial, browse through our best Google Slides templates, if you need a quick design jumpstart to your next presentation:
How to Quickly Add together Images to Google Slides (Video)
Learn how to add together an prototype to a slide in your Google Slides presentation quickly with the screencast below. We too cover simple image adjustments you can utilize.
Or, follow along with the more detailed step-by-step instructions beneath.
Guide to Making Nifty Presentations (Costless eBook Download)
But first, exist sure to first grab the perfect compliment to this tutorial. Download our new, gratuitous eBook: The Complete Guide to Making Great Presentations. It will assist you lot master the consummate presentation process.


1. How to Select a Good Image
Earlier you tin can add pictures to your Google Slides presentation, starting time with a good image. A poor image volition only backbite from your presentation.
Here are some basics to expect for when selecting an image to use with your presentation:
- Resolution. The epitome'southward resolution should exist high. Low resolution images will not look good when projected.
- Size. Since yous are utilize loftier resolution images, the file size will be larger. But Google Slides does not back up a size of more than fifty MB.
- Aspect ratio. For images used as backgrounds for Google Slides the aspect ratio should be the same as the slide's aspect ratio.
- Focused. Avoid using blurry or out of focus pictures in your Google Slides presentation. They can make it seem unprofessional.
- File blazon. Make certain that the image you lot select is in a supported format for Google Slides. Stick to .PNG, .JPG or .GIF files.
- Subject field matter. The content of the paradigm should fit your topic. An image of clowns, for example, would not fit with a financial presentation.
- Bachelor. Not all images that yous find online can be freely used. Make sure you select an image that is royalty free or that you lot own.
For a more detailed explanation of aspect ratio, study this tutorial:
One time you've found a good image, you can then insert it into your Google Bulldoze Slides presentation.
2. How to Insert a Picture Into a Google Slide
Y'all've plant the perfect epitome. Yous're set up to insert information technology into your presentation. Here's what to do next:
Step ane. Open Your Google Slides Presentation
Open your Google Drive using the URL, drive.google.com. Your drive should look something like this:
.jpg)
.jpg)
.jpg)
Double-click the presentation you will be working with. In this example, the presentation is called Travel Industry Overview. Your presentation opens. Go to the slide where you desire to insert the paradigm:
.jpg)
.jpg)
.jpg)
For this example, we want to add a travel epitome to one of the slides in the presentation.
Footstep 2. Open the Insert Image Screen
Click the text area of the slide. Select the Insert > Image pick from the main Google slides menu:
.jpg)
.jpg)
.jpg)
The Insert Image screen displays:
.jpg)
.jpg)
.jpg)
Equally you can encounter, there are six options you lot can use to import an image into your Google Slides presentation:
- Upload. Upload an image stored on your computer. This is the default option.
- Take a snapshot. Utilize your webcam to take a photo to use in your presentation.
- Past URL. Enter a URL where your image is located.
- Your albums. Utilize an image stored in your Google+ social media business relationship.
- Google Drive. Insert an paradigm stored in your Google Drive.
- Search. Allows you to look for an image from Google search, the LIFE photo archive, or the stock image archive.
Click the option you wish to utilize to download your image. For this example, we'll focus on the upload option.
Step 3. Insert the Image
Click the Upload choice in the top left of the screen. Click the Cull an Epitome to Upload button. File Explorer opens. Navigate to the folder where your images are stored:
.jpg)
.jpg)
.jpg)
Click the image you lot desire to upload and click the Open button.
Note: We used a royalty-complimentary image from Envato's PhotoDune . We've cropped the image so that it will work better in this slide presentation.
The prototype appears on your slide:
.jpg)
.jpg)
.jpg)
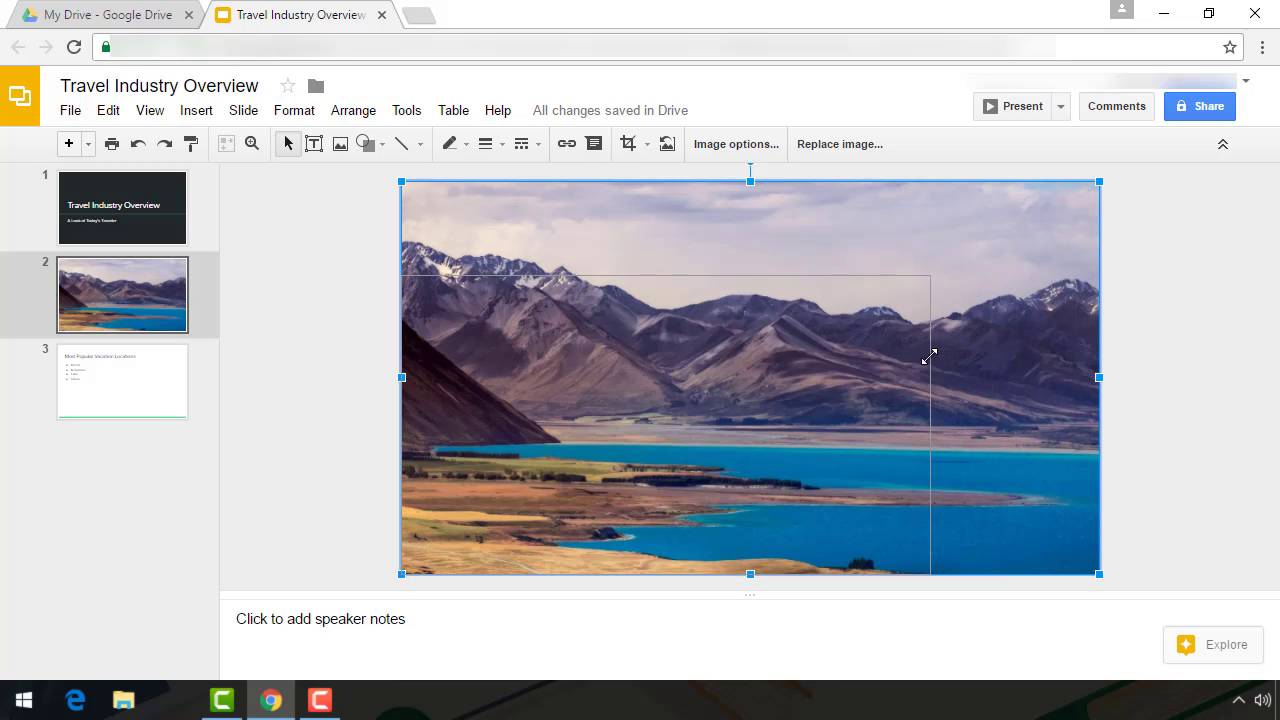
Since this was a big image, it takes up well-nigh of the slide. We'll have to conform information technology.
Step iv. Adjust the Paradigm
Adjust the image by clicking on it. You'll encounter eight handles around the border of the image:
.jpg)
.jpg)
.jpg)
Click on one of the handles to select it. Concord and drag the edge upward or down to adjust the size of the epitome. If yous select one of the corner handles and drag it diagonally, the epitome will remain in its original proportions:
.jpg)
.jpg)
.jpg)
Once your image is properly sized, click on center of the epitome and elevate it to the correct location on the slide.
At present that you understand how to insert an epitome into your Google Slides presentation, you're ready to learn how to use an epitome as a groundwork to a slide or change the color of a slide's groundwork.
3. How to Alter Your Slide Groundwork
You can command backgrounds for Google Slides. There are two aspects of your Google Slides groundwork that you tin alter. Yous tin can:
- Change the background color.
- Add a background epitome.
In this department, nosotros'll explain how to do both.
As with inserting an image, start by opening the slide where you want to alter the background:
.jpg)
.jpg)
.jpg)
Click the Background choice on the toolbar. The Background dialog box displays:
.jpg)
.jpg)
.jpg)
Allow's accept a quick wait at how to change the background color first.
How to Alter the Slide Background Color
To alter the background color of a slide, click the downward arrow to the correct of the Color pick in the dialog box. A color palette displays:
.jpg)
.jpg)
.jpg)
Click on the color you would similar to utilize to the background. So click the Washed push. The colour you selected is applied to the slide:
.jpg)
.jpg)
.jpg)
It really doesn't matter what format of slide you utilise. The process works with all slide types. If the background is colored or there is already an image there, the current background volition be replaced by your new selection.
How to Add an Image to Your Slide Background
From the Background dialog box, click on the discussion Cull to the right of the Image choice. The Insert background paradigm screen displays:
.jpg)
.jpg)
.jpg)
As you lot can see, it is very similar the Insert Epitome screen, with the same vi options. For this tutorial, we are going to use the Upload option.
After you click the Cull an image to upload button from the eye of the screen, File Explorer opens. Find the file you wish to use and your background and click the Open button. Then click the Done button. The image is now the background of your slide:
.jpg)
.jpg)
.jpg)
Note: You may demand to change the colour of your text to make it more visible confronting your background image.
Also, because the image is being used every bit a groundwork, y'all cannot resize information technology or motion it on the slide.
How to Undo Slide Background Changes
If yous notice you do not like the changes you made, you can revert to the default settings from the Background dialog box:
.jpg)
.jpg)
.jpg)
Adjacent to the Reset to theme option click Reset. The click Done. The slide returns to its default settings.
4. How to Transform an Imported Epitome
There are several artistic ways to transform an image inside a Google Slides presentation. In this tutorial, nosotros'll explicate how to practice iv image transformations:
- Make an image transparent.
- Add an paradigm in a mask.
- Add borders to an prototype.
- Recolor the prototype.
Let'south get started. First, yous'll demand to select the slide that has the paradigm you want to transform. Do not use a slide that has a background image. For example, nosotros'll work with this slide over again:
.jpg)
.jpg)
.jpg)
We'll wait at making the epitome transparent kickoff.
How to Make an Prototype Transparent in Google Slides
Kickoff, click on the image to select it. With the paradigm selected, click Format > Paradigm Options from the master menu at the height of the screen. The Epitome Options sidebar displays to right of the slide:
.jpg)
.jpg)
.jpg)
Below the transparency option on the Image Options sidebar is a slider. It'southward difficult to encounter because the slider is clear, but it volition become visible when you select information technology:
.jpg)
.jpg)
.jpg)
As you move the slider to the correct, the image becomes more transparent. You'll also run across percentages equally y'all move the slider. Here is what the image looks similar with the slider at about 66%:
.jpg)
.jpg)
.jpg)
Detect how the image has faded. If there is text on the slide, you volition exist able to run across it through the image.
How to Change an Epitome's Colors in Google Slides
Y'all can also use the Image Options sidebar to modify the colors of an prototype. For example, you could make 1 color stand out more than or you could change the colors to black and white.
To change an prototype's colors, click the down arrow next to No Color under the Recolor selection. The system displays thumbnails of various recolor options:
.jpg)
.jpg)
.jpg)
Utilise the scroll bar to the right of the thumbnails to roll through the diverse color options. When yous find a color pick you like, click on it to apply information technology to your paradigm. In the example below I selected the thumbnail on the lower right to give it a sepia tone result:
.jpg)
.jpg)
.jpg)
How to Add an Epitome in a Mask in Google Slides
Some other artistic touch you can add to your images is to put them inside a shape. Here'due south how:
Showtime with the slide open that has the paradigm that you want to embed in a mask. Click on the image to select it. Click on the downward arrow next to the Ingather tool in the Tools menu across the summit of the screen. A sub-menu with diverse types of shapes appears:
.jpg)
.jpg)
.jpg)
Click the arrow to the correct of the shape choice you are interested in exploring. Diverse shaped image masks appear. Click on a shape to select information technology and utilize it to your epitome. In the image below, I selected a horizontal scroll:
.jpg)
.jpg)
.jpg)
How to Add Borders to an Image in Google Slides
Another way to enhance images is to add a border. Commencement past selecting your paradigm. At that place are three icons on the tool icon that volition let you to add an bonny border to your image:
- Border color
- Border weight
- Border dash
Here's where you lot find the tools:
.jpg)
.jpg)
.jpg)
Step i. Select a Edge Color
The offset thing you want to do when creating a border is to select a color. Click the down arrow to the right of the Edge colour icon. A color palette displays. Click on a colour to select it. This will be the color of your border.
When selecting a edge color, it'due south a adept idea to cull a color the complements or contrasts with the colors in your image. In the instance illustrations shown in Steps 2 and 3 below I selected gray because that complements the tones in the image.
Step two. Select a Edge Weight
The next step when choosing a border is to select the edge weight. The edge weight defines how thick your edge will be.
To select a border weight, click the downward arrow to the correct of the Border weight icon. A sub-card displays:
.jpg)
.jpg)
.jpg)
Click on a border weight to apply it to your image.
Step 3. Apply a Border Dash (Optional)
You can further enhance your border by selecting a dashed pattern. To open the Border nuance sub-carte du jour, click the arrow to the correct of the border dash icon. You'll see various blueprint options:
.jpg)
.jpg)
.jpg)
Click on a pattern to utilize information technology to your image. Hither's our completed border using a dashed design:
.jpg)
.jpg)
.jpg)
Make Great Presentations (Complimentary eBook Download)
Nosotros have the perfect compliment to this tutorial, which will walk you lot through the consummate presentation process. Learn how to write your presentation, blueprint it like a pro, and prepare information technology to present powerfully.
Download our new eBook: The Complete Guide to Making Corking Presentations. Information technology'due south available for gratis with a subscription to the Tuts+ Concern Newsletter.


Conclusion
You've just learned how to add together a picture show to Google Drive Slides. By adding images, your presentation will be more interesting and effective. You tin also transform your imported images quickly past cropping, adding a mask, or borders. You tin even replace the groundwork of your slide with an image of your choice.
Using images are merely one way to create an effective Google Drive Slides presentation, notice more helpful techniques in our Google Slides tutorials on Envato Tuts+.
Did you find this post useful?


How To Add A Picture As A Background On A Google Drawing,
Source: https://business.tutsplus.com/tutorials/how-to-add-pictures-and-backgrounds-in-google-drive-slides--cms-29079
Posted by: morenoknestagave36.blogspot.com
0 Response to "How To Add A Picture As A Background On A Google Drawing"
Post a Comment